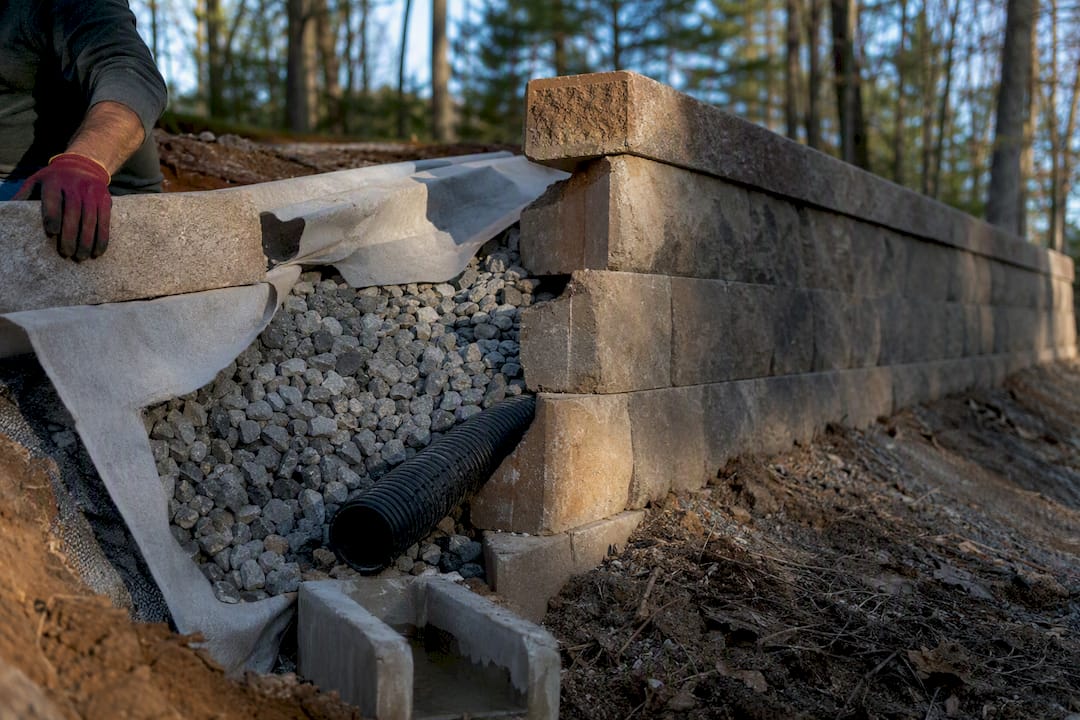
Yes, a retaining wall needs drainage. Without a way to escape, water builds up behind the wall and creates hydrostatic pressure that pushes it forward until it bulges, cracks, or collapses. A properly engineered system relies on four parts working together: a drain stone zone, non-woven filter fabric, a sloped perforated pipe, and an outlet that daylights safely away from the wall. If your wall shows wet spots, leaning, or bulging, inspect the drainage now, and if you’re building new, design it in from day one.
TL;DR:
- Proper drainage relies on a four-part system: drain stone, non-woven fabric, perforated pipe, and an outlet that daylight away from the wall.
- Walls on clay soils or in heavy rainfall areas are at higher risk of failure without upsized components, such as wider stone zones and larger pipes.
- Installing drainage during initial construction is far more cost-effective and reliable than retrofitting later, especially for walls over 4 feet tall.
- Common mistakes include burying outlets, skipping fabric, using improper stone, and mis-sloping pipes, all of which cause system failure within a few seasons.
- Regular inspections after storms and seasonal checks help identify issues early, but complex problems may require professional assessment and repair.
Table of Contents
- What Is Retaining Wall Drainage and Why Does It Matter?
- The Four-Part Drainage System Every Wall Needs
- How Do You Install Drainage in a New Retaining Wall?
- Can You Add Drainage to an Existing Retaining Wall?
- Materials and Sizing: What Specs Should You Expect?
- What Are the Most Common Drainage Mistakes?
- How Often Should You Inspect Retaining Wall Drainage?
- When Do You Need an Engineer or Permit for Retaining Wall Drainage?
- What Contractors Look For Before They Start Digging
- Get a Drainage Inspection From a professional exterior remodeling contractor
- Primary Sources and Installation Manuals
- Sources
What Is Retaining Wall Drainage and Why Does It Matter?
Hydrostatic pressure is what happens when water gets trapped in the soil behind a wall with nowhere to go. Soil itself isn’t the main enemy of a retaining wall. Trapped water is. As rain and groundwater accumulate behind the wall face, that water adds weight and lateral force to soil that’s already pushing against the structure. A cubic foot of saturated soil weighs meaningfully more than the same soil dry, and all that extra mass shoves directly against the wall with no outlet. This buildup, not the soil load itself, is cited as the leading cause of retaining wall failure in wall design guidance.
You don’t need a soil engineer to spot the warning signs. Watch for these on any wall over a couple of feet tall:
- A visible bulge or bow in the wall face, especially near the midpoint or base
- A wall that’s leaning forward more than it did last season
- Horizontal or stair-step cracks in block, brick, or poured concrete
- Persistent wet or dark staining on the wall face, even days after rain
- Efflorescence (white mineral deposits) that suggests water is wicking through the material
- Soil settling or sinking near the top of the wall, which often means water is finding its own path through gaps
Not every wall is at equal risk. Clay soils hold water and drain slowly, so they generate hydrostatic pressure faster and more severely than sandy or gravelly sites. Heavy rainfall regions compound the problem, and so does freeze-thaw cycling: water trapped in soil pores expands when it freezes, prying at the wall from behind with every cold snap. A retaining wall built on clay in a region with harsh winters faces a fundamentally different risk profile than the same wall built on well-drained sandy loam in a mild climate, even if both walls look identical from the front.
The good news is that this is a solvable, well-documented problem. Contractor guides like Family Handyman’s drainage retrofit walkthrough and design resources from firms such as RWPS consistently point to the same fix: give the water a predictable, low-resistance path out. That’s what the four-part system below is built to do.
The Four-Part Drainage System Every Wall Needs
Every functional drainage solution for retaining walls, from a 2-foot garden wall to a segmental block wall holding back a driveway, relies on the same four components. Skip one, and the whole system tends to fail slowly, then all at once.
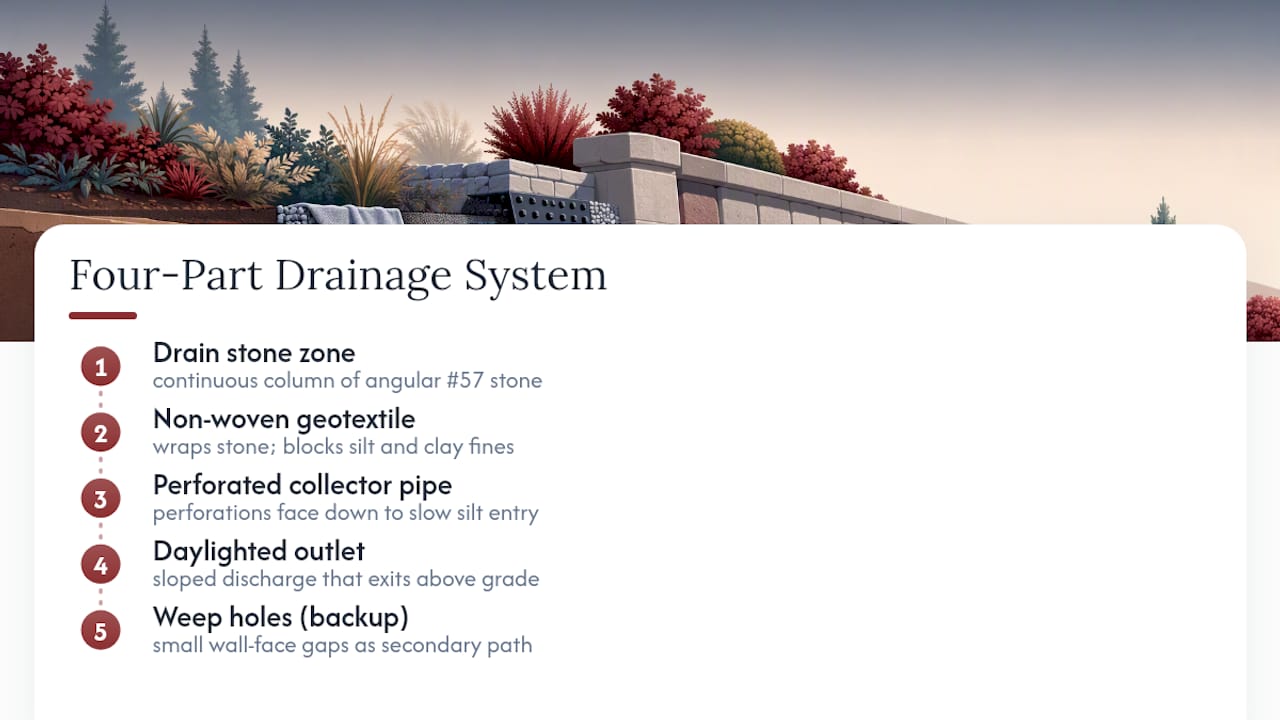
Drain stone zone. This is a continuous column of clean, angular crushed stone (commonly graded as #57 stone) running the full height of the wall directly behind it. Angular stone locks together and leaves consistent void space for water to travel through; rounded river rock or pea gravel compacts and shifts over time, closing off those voids. The zone typically runs at least a wide enough dimension to allow effective drainage, and it should widen for taller walls or heavier soils.
Non-woven geotextile filter fabric. Wrapped around the stone zone like an envelope, this fabric lets water pass through while blocking fine soil particles (silt and clay fines) from migrating into the stone and clogging it. Manufacturer guidance, including Allan Block’s water management manual, specifically recommends non-woven fabric over woven landscape fabric because it resists “blinding,” the gradual sealing-over that happens when fine soil particles clog a fabric’s pores.
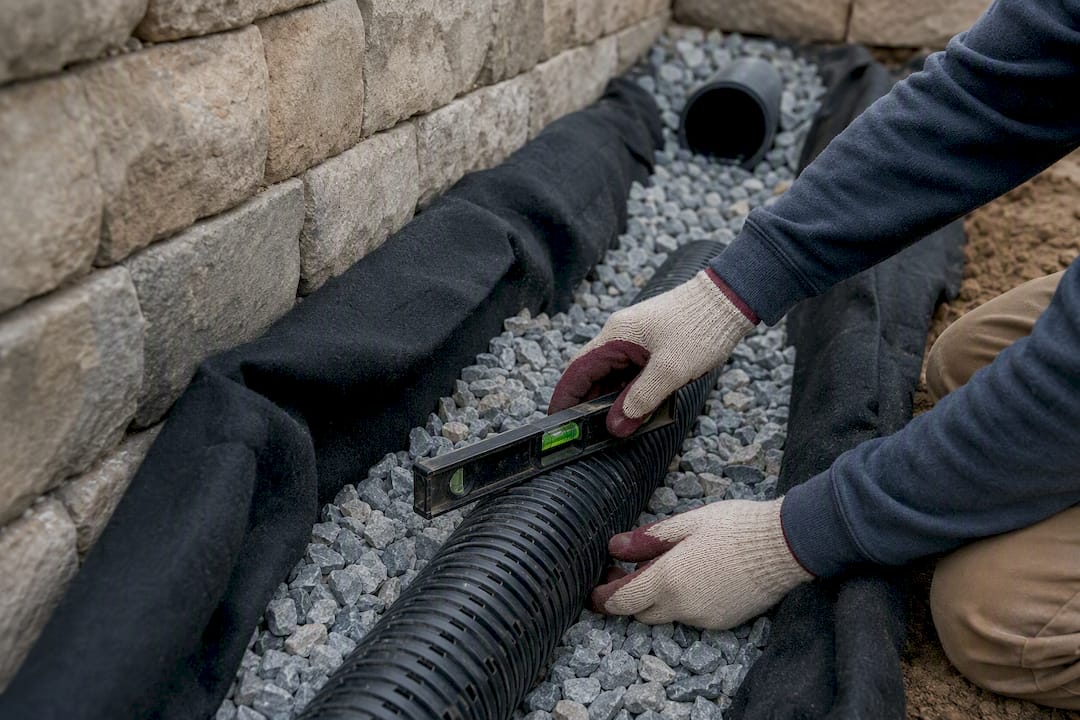
Perforated collector pipe. A perforated pipe of sufficient diameter sits at the base of the stone zone, catching water that percolates down and channeling it out. The perforations should face down, not up, a detail that surprises a lot of homeowners.
Daylighted outlet. The pipe has to actually go somewhere. It needs a slope sufficient to direct water toward a discharge point that “daylights” (exits above grade) at a safe distance from the wall and any structure, never dead-ending underground.
Statistic Callout: A drainage system missing even one of these four elements, most often the fabric or the daylighted outlet, is a common root cause of clogging and backup according to retaining wall drainage design guidance. The system only works as a complete unit.
Here’s a detail contractors learn early and homeowners rarely hear: pipe orientation isn’t cosmetic. Family Handyman’s installation guide notes that holes-down placement slows the rate at which silt enters the pipe and clogs it, extending the system’s working life by years compared to holes-up installation. Combined with the fabric wrap, this orientation is what separates a drainage system that works for decades from one that clogs within a few seasons.
Weep holes, small gaps left in the wall face itself, serve as a secondary, backup path for water that bypasses the main system. They’re not a substitute for the four-part system, but they’re cheap insurance worth including, especially on segmental block walls where the joints make them easy to build in.
How Do You Install Drainage in a New Retaining Wall?
Building drainage into a new wall costs far less and works far better than retrofitting one later. If you’re planning new construction or a full rebuild, follow this sequence.
- Excavate the drainage zone. Dig back from the wall face enough to accommodate at least a 12-inch stone column running the wall’s full height, plus room for the compacted base and any geogrid reinforcement your design calls for.
- Prepare the bedding. Compact a gravel base at the trench bottom to create a stable, level foundation for both the wall footing and the pipe run.
- Line the zone with fabric. Roll non-woven geotextile fabric down the excavated face and across the base, leaving enough overlap on both sides to fully wrap the stone once it’s placed. Think of this step as building an envelope you’ll seal shut later, not a liner you install and forget.
- Set the perforated pipe. Lay the 4-inch pipe at the base of the stone zone with perforations facing down, and check the slope with a level or laser: you’re targeting 1 to 2 percent fall toward the outlet, not a flat run.
- Backfill with stone in stages. Add drain stone in lifts, not all at once, to keep the fabric aligned and avoid shifting the pipe out of position.
- Fold and seal the fabric envelope. Once the stone reaches near the top of the zone, fold the overlapping fabric back over the stone and secure it, fully enclosing the aggregate before adding topsoil above.
- Add weep holes as backup. If your wall system allows for it, build in weep holes at the base course to give trapped water a secondary escape route.
- Confirm the outlet daylights properly. The pipe should exit at a visible point, ideally protected with a short riser and grate or a small rock apron, well clear of the wall base and any adjacent structure.
- Run the hose test. Pour water into the drainage zone from the top and time how quickly it emerges at the outlet. A properly installed system should show water at the outlet within minutes; a delayed or absent flow means something is blocked, kinked, or mis-sloped before you bury it for good.
Pro Tip: Run the hose test before you backfill the final lift of soil, not after. Once that top layer of soil and sod goes down, fixing a slope error means re-excavating the whole zone instead of just re-checking a pipe.
Before signing off on any new wall installation, whether you’re doing it yourself or reviewing a contractor’s work, confirm a few quality-control checkpoints: the fabric has no tears or gaps at seams, the pipe slope was verified with a level (not eyeballed), the outlet is visible and unobstructed, and the stone used is angular, not rounded. If you’re hiring the work out, ask for photos of the drainage zone before it’s covered. It’s the one part of the wall you’ll never see again once the project wraps.
Can You Add Drainage to an Existing Retaining Wall?
Retrofitting drainage into a wall that’s already standing is more limited than building it in from scratch, but it’s often enough to stop active water damage before it becomes structural failure.
First, figure out which category your wall falls into. A retrofit is worth attempting when the wall shows minor wet staining, slow water seepage, or occasional wet spots after storms, but the wall itself is still straight, uncracked, and structurally sound. Rebuilding is the better answer when you see active bulging, a leaning face, stair-step cracking, or a wall that’s shifted noticeably from its original line. Water problems on a wall that’s already failing structurally are a symptom, not the root cause at that point.
For walls that qualify for a retrofit, here are the realistic options, roughly ordered from least to most invasive:
- Drill-in weep holes. Boring small drainage holes directly through the wall face at the base gives trapped water an immediate escape route, and it’s the least disruptive option available.
- Surface swales and regrading. Sometimes the fix isn’t behind the wall at all. Regrading the soil at the top of the wall to direct surface runoff away, rather than toward it, cuts the volume of water reaching the wall in the first place. Our grading and yard drainage guide covers how slope and grading interact with a wall’s drainage needs.
- Small trench and pipe installation. Digging a narrow trench along the base of the wall to install a short run of perforated pipe, tied into a daylighted outlet, can intercept water before it builds pressure against the lower courses.
- Slot drains at the wall base. A slot drain set into the ground just in front of or behind the wall’s toe captures surface water before it saturates the backfill.
- Full excavation behind the wall. If shallow fixes aren’t cutting it, excavating a section behind the wall to inspect for existing gravel, check for a collapsed or missing pipe, and rebuild the drainage zone from scratch is the most effective retrofit, and also the most labor-intensive.
Before choosing an option, probe behind the wall in a few spots to see if there’s already a gravel zone present, just failed or clogged, versus no drainage system at all. A wall with existing gravel that’s simply lost its outlet is a much smaller fix than a wall built with no drainage provision whatsoever. In either case, a short-term mitigation, like temporarily rerouting surface water away from the wall with a swale, can buy time until a full retrofit or rebuild gets scheduled.
Materials and Sizing: What Specs Should You Expect?
Contractors and designers work from a fairly consistent baseline for drainage sizing, though every spec has conditions under which it needs to go up.
| Component | Minimum standard | When to upsize |
|---|---|---|
| Drain stone zone width | 12 inches | Walls over 4 feet, tiered systems, or saturated clay soils |
| Perforated pipe diameter | 4 inches | High rainfall-runoff sites or long pipe runs with heavy expected inflow |
| Pipe slope to outlet | 1 to 2 percent | Steeper slope preferred where site grade allows without added excavation |
| Filter fabric type | Non-woven geotextile | Denser or higher-strength fabric in fine, silty clay soils |
These figures track closely with general sizing guidance for retaining wall drainage, which frames the 12-inch stone zone and 4-inch pipe as a workable baseline that should scale up with wall height and soil conditions, not stay fixed regardless of site.
Tiered wall systems deserve a specific mention. When one wall sits above another, the upper wall’s discharge becomes the lower wall’s inflow unless you intercept it. Drainage needs to be separated between tiers or interconnected deliberately, not left to run downhill onto whatever wall happens to be below.
On stone selection, stick to angular, washed aggregate like #57 stone. Pea gravel is smooth and rounds together too tightly under load, and crusher run contains fines that clog a drainage zone almost as fast as no stone at all. For reinforced segmental walls, geogrid selection and embedment length also depend on soil type and wall height, and manufacturer charts from suppliers like Tensar walk through how those adjustments work. Segmental block systems generally follow guidance published through the National Concrete Masonry Association, and larger or engineered walls may reference ASTM material standards for the stone gradation and pipe specifications used.
What Are the Most Common Drainage Mistakes?
A short list of installation shortcuts causes the overwhelming majority of drainage failures, and they’re the first things worth checking on any wall showing trouble.
- Burying or dead-ending the outlet pipe. A pipe that discharges underground instead of daylighting has nowhere for water to go, and the entire system backs up as though it were never installed.
- Skipping the fabric. Without non-woven geotextile wrapping the stone zone, fine soil particles migrate in and clog the aggregate within a few seasons.
- Using the wrong stone. Rounded river rock or crusher run in place of angular washed stone compacts and closes off drainage voids.
- Flat or reverse-sloped pipe runs. A pipe with no fall, or one that was accidentally laid sloping backward, traps water instead of moving it.
These four issues show up repeatedly across contractor field reports as the most avoidable and most common causes of wall drainage failure. Diagnosing which one you’re dealing with doesn’t require excavation on day one. Start with the hose test described earlier: pour water in at the top of the visible stone or near a weep hole and time how long it takes to reach the outlet. Probe the soil at the base of the wall after a dry stretch. Standing water or mud that never fully dries points to a blocked or missing system underground. Walk the full length of the wall looking for the outlet itself; if you can’t find it or it’s buried under mulch and soil, that’s very likely your answer.
Until a full repair can be scheduled, a temporary swale or French drain diverting surface water away from the wall reduces the load on a compromised system. It’s not a fix, but it slows the clock on further movement.
How Often Should You Inspect Retaining Wall Drainage?
Drainage systems are largely invisible once they’re buried, which is exactly why a seasonal check matters more than most homeowners assume.
- Inspect after every major storm. Walk the base of the wall and confirm water is actively flowing from the outlet, not just present but silent and pooling.
- Do a full seasonal check each spring and fall. Spring reveals winter freeze-thaw damage; fall inspection catches leaf and debris buildup before winter sets in.
- Clear the outlet of debris. Mulch, leaves, and sediment collect at daylighted outlets and silently choke off flow; a quick clear with a hand tool keeps the path open.
- Watch vegetation near the wall and outlet. Roots can infiltrate and crush pipe over time, and dense growth right at the outlet can mask a blockage from view.
- Check for new wet spots or staining that weren’t present at the last inspection, since these often show up before any visible structural movement does.
- Call a professional if you spot active movement. Bulging, new cracking, or a wall that’s shifted position calls for an engineer or experienced contractor, not a DIY patch.
Routine gutter and downspout maintenance plays into this too. Downspouts discharging near a retaining wall can overwhelm its drainage capacity during heavy rain, so it’s worth reviewing how your gutters are maintained alongside your wall inspection schedule.
When Do You Need an Engineer or Permit for Retaining Wall Drainage?
Most residential retaining walls under about 4 feet don’t require a stamped engineering design, but several conditions push a project past what a standard installation can safely handle.
- Wall height above roughly 4 feet. Many municipalities set permit and engineering requirements right around this threshold, since lateral loads increase substantially with height.
- Surcharge loads nearby. A driveway, patio, pool, or structure sitting close to the top of the wall adds load the design has to account for.
- Steep slopes above or below the wall. Grade changes on either side change how water and soil pressure move against the structure.
- High water table or persistently saturated soil. Sites where groundwater sits close to the surface need drainage sized well beyond the residential baseline.
- Tiered or stacked wall systems. As noted earlier, upper-wall discharge becomes lower-wall inflow, and that interaction typically needs site-specific design.
If any of these apply, get a geotechnical evaluation or a professional engineer’s input before construction, not after a problem shows up. Never discharge your wall’s drainage outlet onto a neighboring property; check local drainage easement rules first. And whatever the site conditions, protect the outlet itself with a grate or riser so it doesn’t silently fail years after installation.
What Contractors Look For Before They Start Digging
On-site, the first thing an experienced crew does isn’t grab a shovel. It’s dig a small test hole to check what soil you’re actually dealing with, because a drainage plan built for sandy loam falls apart fast in dense clay. Locating utilities comes next, since a buried gas or electric line changes where the drainage trench and outlet can realistically go. Then comes confirming an outlet actually exists on the property and that grade allows it to daylight safely, which sounds obvious until you’ve seen how many walls were built without one.
When you’re getting an estimate from any contractor, ask specifically what stone type they’re specifying, whether non-woven fabric is included, and where the outlet will discharge. A vague answer on any of those three is worth a follow-up question. A solid estimate should also spell out excavation scope, projected timeline, and what cleanup looks like once the stone and fabric are buried, since that’s the point where most homeowners lose visibility into the work. If your project also touches surface water management around the home, a look at how yard grading affects drainage is worth a conversation with your contractor before the wall work even starts, especially on properties where a trench needs active dewatering during excavation.
— Adam
Get a Drainage Inspection From a professional exterior remodeling contractor
Diagnosing a failing retaining wall from the surface only gets you so far. Professional contractors bring excavation, masonry, and grading experience to actually open up the problem area, confirm what’s happening behind the wall, and fix it the first time instead of patching symptoms. Experienced teams handle the full scope: site inspection, excavation, drain stone and pipe installation, outlet routing, and permitting assistance where projects need it.

A site visit typically covers a soil check, a probe for existing drainage or standing water, and a look at how surface runoff and gutters are contributing to the problem. You’ll walk away with a clear scope of work and a documented plan, not a vague verbal estimate. Since drainage failures often show up alongside related exterior issues, from concrete block damage to gutter systems discharging too close to the wall, it’s worth having one contractor look at the whole picture. Before your appointment, jot down when you first noticed wet spots or movement and take a few photos after the next rain. Browse our past masonry and exterior projects for a sense of the work, then request an on-site evaluation to get a straight answer on what your wall actually needs.
Primary Sources and Installation Manuals
For readers who want to go deeper on specifications and code-level detail, these resources informed the guidance above and remain useful references:
- RWPS retaining wall drainage system design for the engineering rationale behind hydrostatic pressure and tiered-wall drainage separation.
- Family Handyman’s drainage retrofit guide for homeowner-level installation steps and the hose-test verification method.
- Allan Block’s residential installation manual for manufacturer-specified fabric and water management detailing on segmental block walls.
- Tensar’s AmeriGrid geogrid guidance for reinforcement sizing tied to soil type and wall height.
Sources
- Retaining Wall Drainage System Design, St. Louis
- Adding retaining wall drainage (Family Handyman)
- Water Management | Residential Installation Manual For … (Allan Block)
- Retaining Wall Drainage: Prevent 80% of Wall Failures