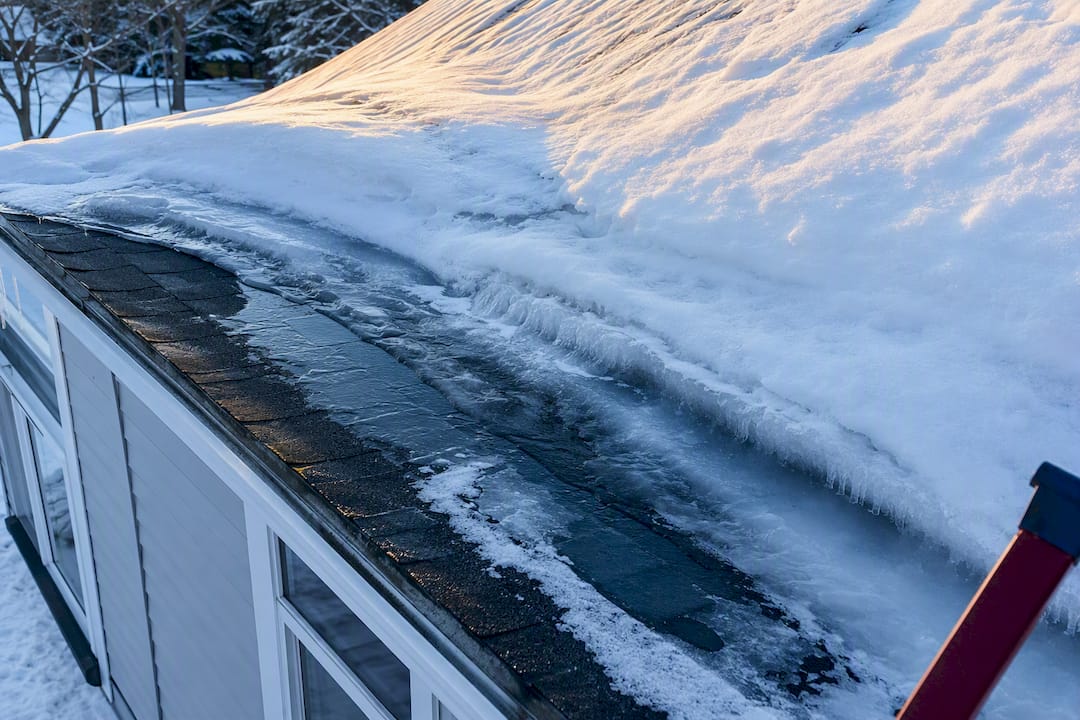
Ice dams put your roof and interior at real risk: trapped meltwater can soak insulation, stain ceilings, and feed mold, and heavy ice occasionally strains gutters and roof edges. If you have an active leak, protect people and belongings first, safely limit water entry, document everything for your insurer, and call a professional if leaking continues. The lasting fix is not a heat cable. It is sealing and insulating your attic properly.
TL;DR:
- Proper attic air sealing and increasing insulation to at least R-30 are essential to prevent heat escaping and melting snow on the roof.
- Gaps around recessed lights, attic hatches, and ductwork are common sources of heat loss that exacerbate ice dam formation.
- Water damage from ice dams can cause mold, structural stress, and ceiling collapse if ignored, with early signs including discolored ceilings and sagging gutters.
- Active leaks require immediate damage control, including documentation and safety measures, before professional repairs and insulation upgrades.
- Long-term prevention involves installing ice barrier membranes extending at least 24 inches inside the wall line and maintaining clean gutters to reduce snow buildup.
Table of Contents
- How Ice Dams Form on Your Roof
- What Ice Dam Damage Actually Looks Like
- What to Do Right Now If Your Roof Is Leaking
- The Long-Term Fix: Air Sealing, Insulation, and Code-Backed Membranes
- How a Roofing Contractor Diagnoses and Repairs Ice Dam Damage
- An Editorial Take: Stop Chasing Symptoms
- How J. Signor Exteriors Handles Ice Dam Repair and Prevention
- Sources
How Ice Dams Form on Your Roof
Three things have to line up for an ice dam to build: snow on the roof, a warm roof deck, and a cold overhang where refreezing happens. Heat escaping from your living space warms the underside of the roof deck, melting the bottom layer of snow. That water runs down until it hits the unheated eave, where it refreezes into a ridge of ice. Water keeps backing up behind that ridge until it finds a way in, usually under a shingle tab.
The heat loss almost always comes from somewhere specific: gaps around recessed light fixtures, an attic hatch without a good seal, plumbing stacks, chimneys, or ductwork that runs through unconditioned attic space. Roof geometry matters too. Valleys, dormers, and low-slope sections collect more snow and create more surface area for ice to form, so a complex roofline is more dam-prone than a simple gable.
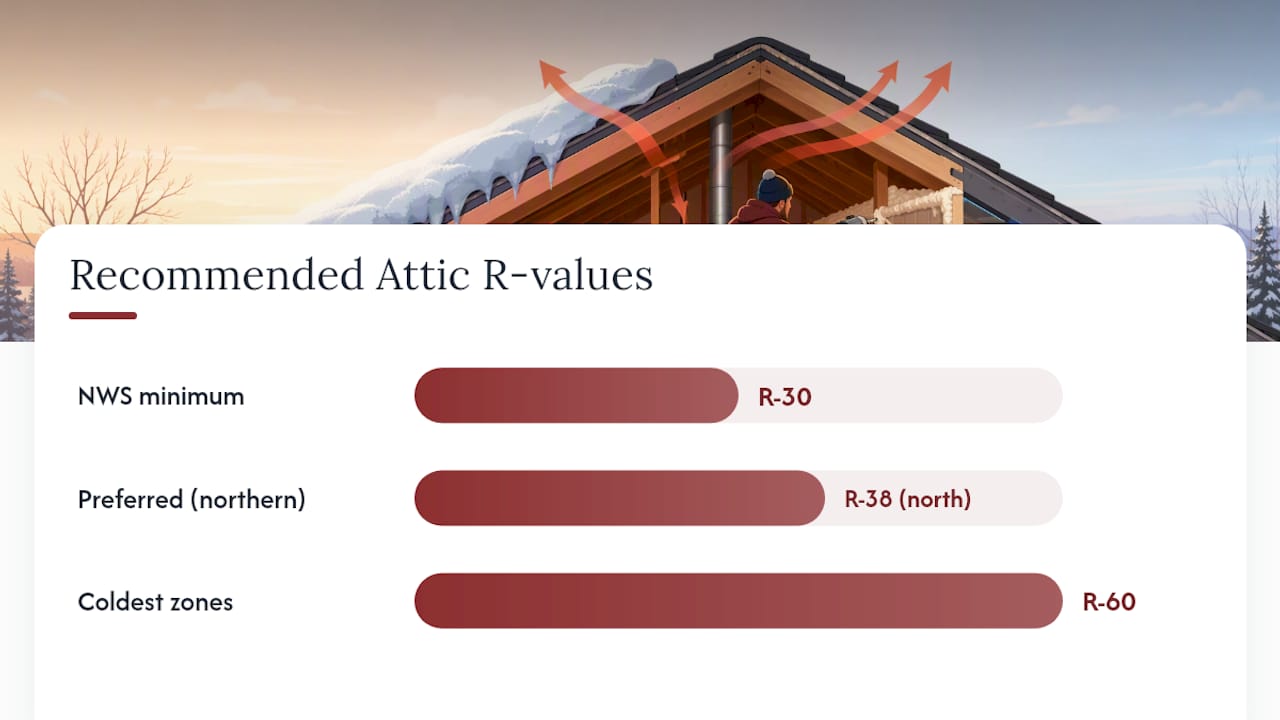
The National Weather Service recommends a minimum attic insulation value of R-30, with R-38 preferred in northern climates, specifically because thin insulation lets too much heat reach the roof deck. Homes in the coldest zones often need R-60 to keep the whole roof surface at a uniform, cold temperature.
What Ice Dam Damage Actually Looks Like
Ice dam roof damage rarely announces itself all at once. It usually starts small and gets expensive if ignored.
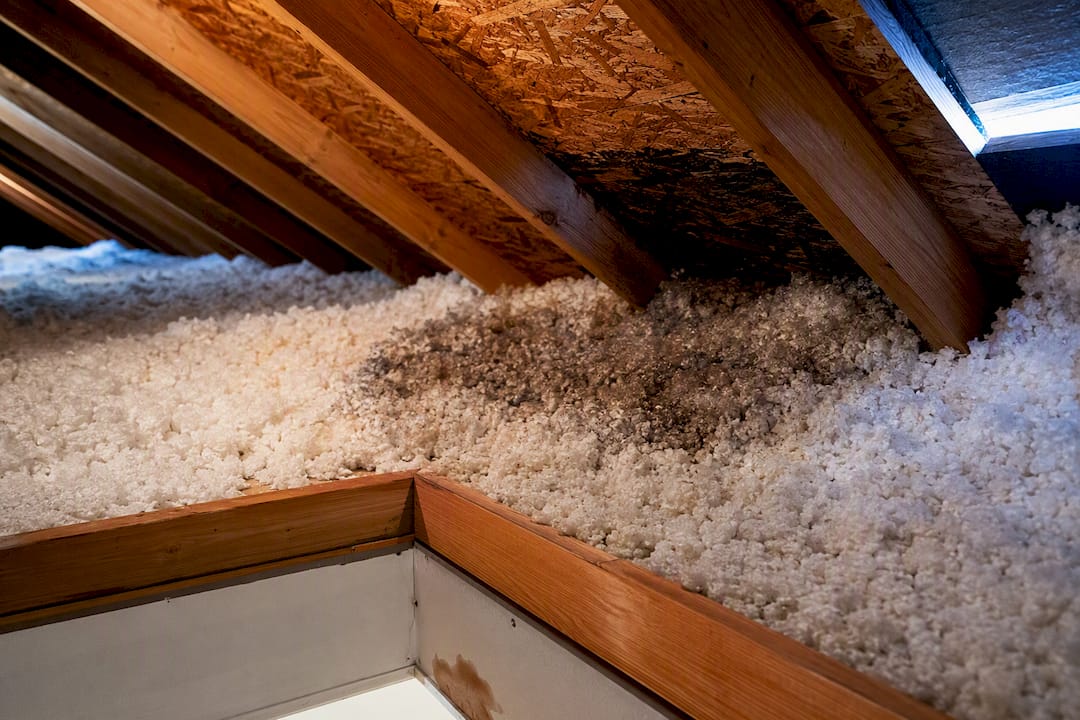
Meltwater trapped behind an ice ridge works its way under shingles and through the underlayment, then soaks into attic insulation. Wet insulation loses most of its R-value and stays damp long after the ice is gone, which is exactly the kind of prolonged moisture that leads to mold growth and indoor air quality problems, according to University of Minnesota Extension. From there, water tracks along rafters and ceiling joists until it shows up as a brown stain or a bubbled patch of drywall, sometimes rooms away from where the ice actually formed.
Ice weight and repeated freeze-thaw cycles also stress gutters, fascia boards, and the roof edge itself, pulling gutters loose or cracking fascia trim. In severe or repeated cases, waterlogged ceiling drywall can sag or collapse.
Watch for these early warning signs:
- Icicles hanging thick along the eaves, especially uneven or discolored ones
- Water stains or peeling paint on ceilings near exterior walls
- A musty smell in upstairs closets or attic spaces
- Sagging gutters or ice buildup that pulls fascia away from the roofline
- Damp or matted attic insulation you can see from the hatch
What to Do Right Now If Your Roof Is Leaking
If water is actively coming through your ceiling, your first job is damage control, not roof repair. Do not climb onto an icy roof to deal with this yourself.
- Protect people and belongings first. Move furniture, electronics, and valuables away from the leak, and place buckets or tarps to catch water.
- Document everything. Photograph and video every affected area, with timestamps, before you touch anything. Insurers move faster when the damage is documented promptly.
- Create a temporary water channel if it’s safe. A calcium-chloride “sock” laid across the ice dam can melt a channel to let trapped water drain, and a roof rake used from the ground removes fresh snow before it feeds the problem.
- Skip the chisel, the hammer, and the rock salt. Travelers Insurance warns that mechanical chipping cracks shingles and rock salt damages roofing materials and landscaping below.
- Call a professional if the leak continues or you see structural sagging. Pros use low-pressure steam to remove ice without tearing up the roof surface.
Pro Tip: Let interior materials dry completely before patching drywall or repainting. Sealing over damp insulation just traps moisture and sets you up for mold and a repeat repair bill next winter.
The Long-Term Fix: Air Sealing, Insulation, and Code-Backed Membranes
Heat cables and occasional roof raking treat symptoms. They do not fix the reason your roof is melting snow unevenly in the first place. The Building Science Corporation is blunt about this: the reliable, lasting solution is airtight sealing of the ceiling plane paired with adequate insulation, not gadgets clipped to the eaves.
That work happens in a specific order. Air sealing comes first, closing the bypasses where warm air actually escapes into the attic: recessed lights, the attic hatch, top plates, and plumbing stacks are the usual culprits. Only after those leaks are closed does add insulation deliver its full value.
Insulation and ventilation targets worth knowing:
- Minimum R-30 attic insulation, with R-38 preferred for northern climates and up to R-60 in the coldest regions
- A roughly 2-inch air gap between insulation and roof sheathing in high-snow climates, per BASC/PNNL guidance
- Mechanical attic ventilation treated as secondary, not a primary fix. It can introduce its own moisture issues if used in place of proper sealing
- An ASTM D1970-compliant, self-adhering ice barrier membrane extending at least 24 inches inside the interior wall line at eaves
That 24-inch figure is not a suggestion; it is the benchmark building codes and roofing manufacturers use for how far an ice barrier needs to reach past the exterior wall to actually stop backed-up meltwater. Round out prevention with basic maintenance: clean gutters each fall, extend downspouts away from the foundation, and rake heavy snow load off the roof edge before a warm spell hits. For a fuller breakdown of these tactics, see our guide to ice dam prevention.
How a Roofing Contractor Diagnoses and Repairs Ice Dam Damage
A qualified contractor does not guess where your attic is leaking heat. Blower door testing pressurizes your home to reveal exactly where air is escaping, and infrared thermography shows cold spots on the roof where insulation has thinned, shifted, or gone missing entirely. Together, those two tests catch bypasses that a routine walk-through inspection usually misses.
From there, the repair scope typically covers:
- Air sealing every bypass identified by the blower door test
- Insulation upgrades to meet R-30 minimum, R-38 or higher in colder zones
- Installing ASTM D1970-compliant ice barrier membrane at the eaves
- Repairing or replacing damaged flashing, shingles, and compromised underlayment
Repairs get staged in a specific order for good reason. Everything needs to dry thoroughly before interior drywall or insulation work begins, and if water has soaked deep into wall cavities, that often means bringing in a water-mitigation specialist alongside the roofing crew. J. Signor Exteriors has handled exterior remodeling across Connecticut for more than 30 years, and that staged, diagnose-first approach is standard practice on every ice dam call.
An Editorial Take: Stop Chasing Symptoms
Most ice dam advice sold to homeowners treats the roof like the problem. It isn’t. The roof is just where a heat-loss problem in your attic becomes visible every January.
Heat cables get marketed as a fix because they’re cheap and fast to install, but they only manage the ice that’s already forming. They do nothing about the warm air escaping around your recessed lights or attic hatch, so you end up buying the same bandage every winter. The research on this is consistent: air sealing the ceiling plane first, then hitting real R-value targets, is what actually stops the melt-refreeze cycle at its source.
Where I’d push back hardest on conventional wisdom is the assumption that thicker insulation alone solves this. Without air sealing underneath it, insulation just hides the leaks better while warm air still finds its way through gaps. If you do only one thing this year, get a blower door test before you spend a dollar on insulation. It tells you where the actual problem lives, not where you assume it does.
— Adam
How J. Signor Exteriors Handles Ice Dam Repair and Prevention
If your roof already shows ice dam damage, or you’d rather not find out the hard way this winter, a proper inspection settles the question fast. J. Signor Exteriors combines blower-door and infrared diagnostics with a hands-on roof assessment, then gives you a written estimate that spells out repair staging and a realistic timeline before any work starts.

Our crews handle the full scope this kind of damage calls for: attic air sealing, insulation upgrades to meet code-recommended R-values, ASTM D1970 ice barrier membrane installation, gutter and flashing repair, and emergency leak response when you can’t wait for a scheduled appointment. We’re licensed, insured, and family-owned, with more than 30 years working on Connecticut roofs through exactly this kind of winter. If you’re seeing stained ceilings, sagging gutters, or ice ridges thick enough to worry about, request an inspection through our roofing contractor page and get a straight answer on what your roof actually needs before the next storm.
Sources
- Preventing Roof Ice Dams — National Weather Service
- Dealing with and preventing ice dams — University of Minnesota Extension
- BSI-046: Dam Ice Dam — Building Science Corporation
- How to identify and help remove an ice dam — Travelers Insurance
- Attic air sealing, insulating, and ventilating for ice dam prevention — BASC/PNNL